
Vegetable Gardening
How to Make a Raised Garden Bed: The Easy Beginner’s Guide

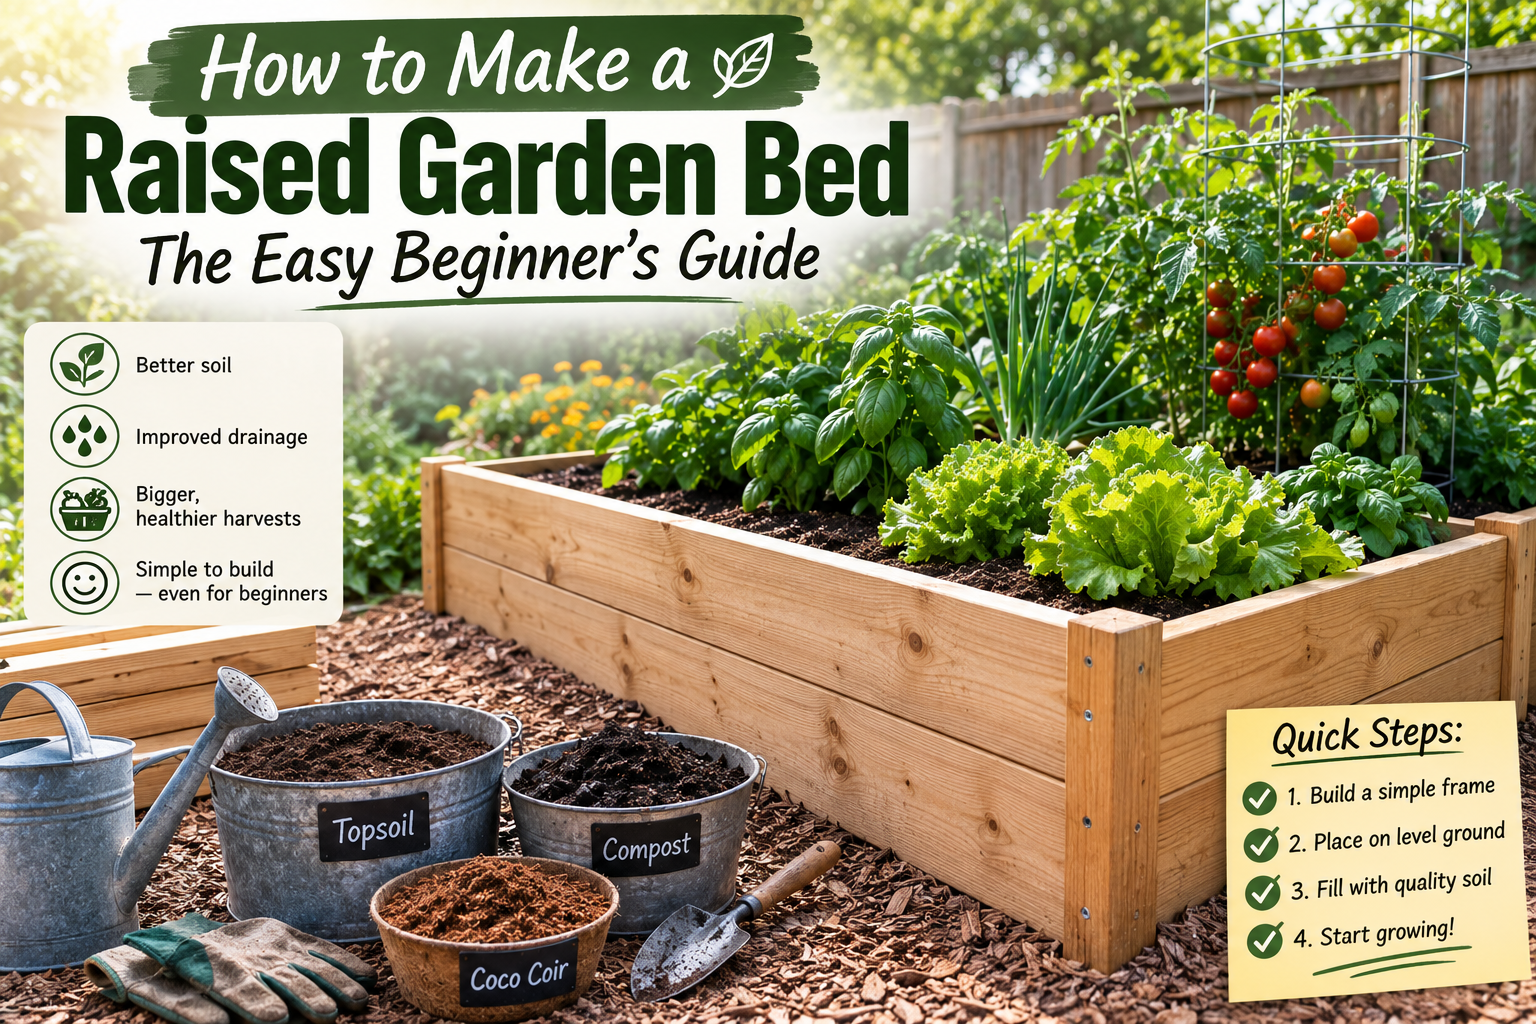
If you’ve ever tried to grow vegetables in poor, compacted soil that drains badly no matter what you do, you already understand why so many gardeners eventually turn to raised beds. Learning how to make a raised garden bed is one of the simplest ways to take control of your soil, your drainage, and ultimately your harvest without needing a lot of tools or gardening experience.
I started building raised beds after struggling with exactly that problem. My in-ground soil stayed compact and waterlogged no matter how much I amended it, and my vegetables never grew the way I hoped. Switching to a raised bed changed that almost immediately, though I made plenty of mistakes along the way that I’ll walk you through here.
This guide covers everything a beginner actually needs: choosing raised bed materials, picking the right size and location, building the frame, mixing the soil, and avoiding the mistakes that trip up most first-timers.
Featured Snippet
How to make a raised garden bed: build a simple rectangular frame from untreated wood or another food-safe material, set it on level ground with 6–8 hours of daily sun, then fill it with a mix of topsoil, compost, and coco coir. Keep the bed about 4 feet wide so you can reach the center without stepping in.
Why Build a Raised Garden Bed
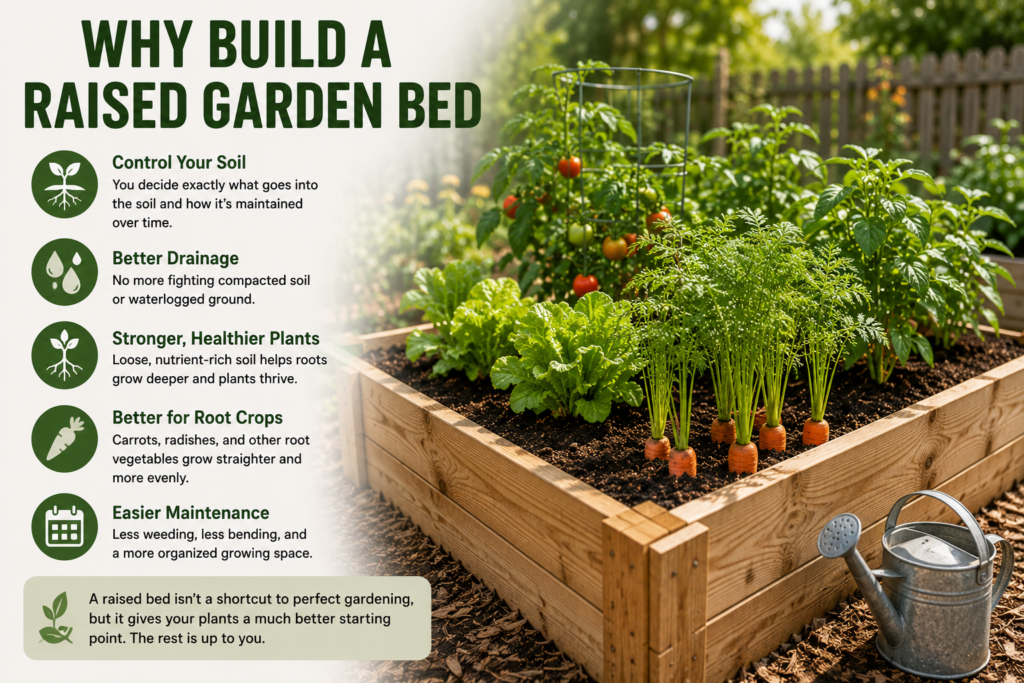
A raised bed gives you something in-ground gardening often can’t: complete control over your soil. Instead of fighting compacted native ground or poor drainage, you decide exactly what goes into the soil and how it’s maintained over time.
That control is the real advantage. Plants get loose, well-draining soil to grow in from day one, which makes a noticeable difference for root crops in particular. Carrots, for example, grow straighter and more evenly in loose raised-bed soil than they typically do in compacted garden ground.
Raised beds aren’t a shortcut to perfect gardening, though. You’ll still need to choose the right crops for the season, water consistently, and keep the soil healthy. What a raised bed does is give your plants a much better starting point; the rest is still up to you.
Before You Start: A Quick Raised Bed Checklist
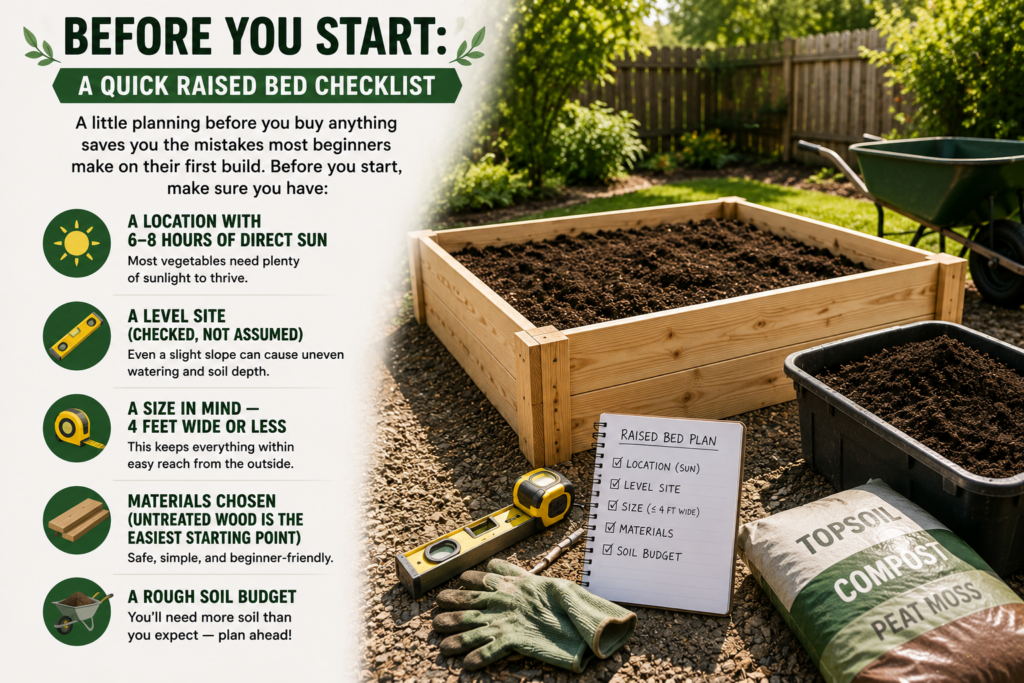
A little planning before you buy anything saves you the mistakes most beginners make on their first build. Before you start, make sure you have:
- A location with 6–8 hours of direct sun
- A level site (checked, not assumed)
- A size in mind — 4 feet wide or less, so you never need to step inside
- Materials chosen (untreated wood is the easiest starting point)
- A rough soil budget, since you’ll need more than you expect
Choosing the Right Location for Your Raised Bed
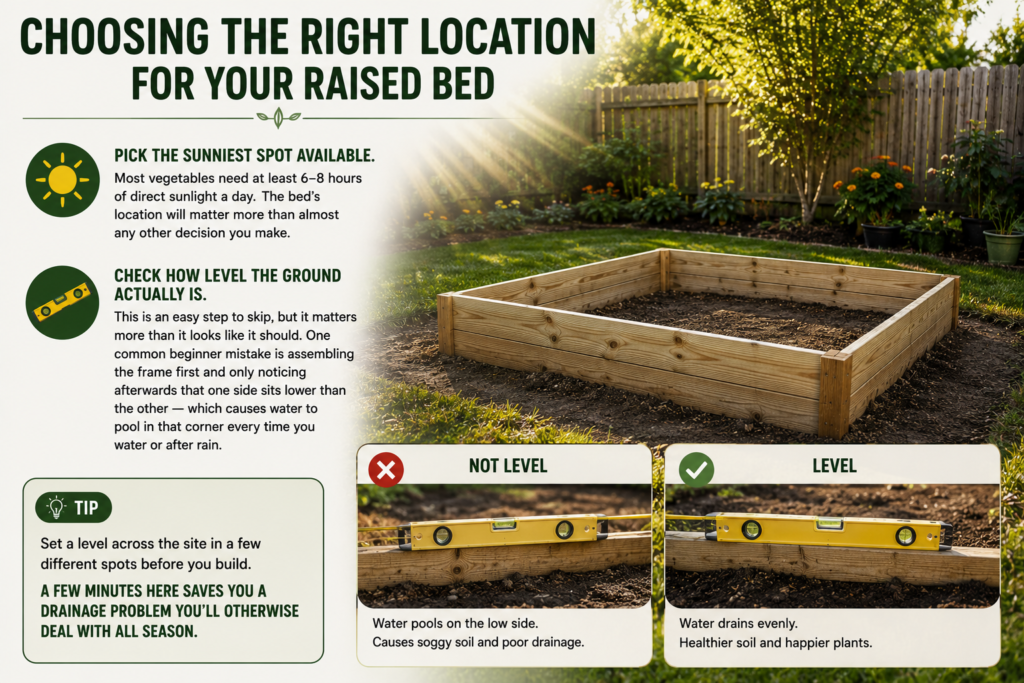
Pick the sunniest spot available. Most vegetables need at least 6–8 hours of direct sunlight a day, and the bed’s location will matter more than almost any other decision you make.
Before you build anything, check how level the ground actually is. This is an easy step to skip, but it matters more than it looks like it should. One common beginner mistake is assembling the frame first and only noticing afterwards that one side sits lower than the other, which causes water to pool in that corner every time you water or after rain.
Tip: Set a level across the site in a few different spots before you build. A few minutes here saves you a drainage problem you’ll otherwise deal with all season.
Choosing the Best Materials for a Raised Garden Bed
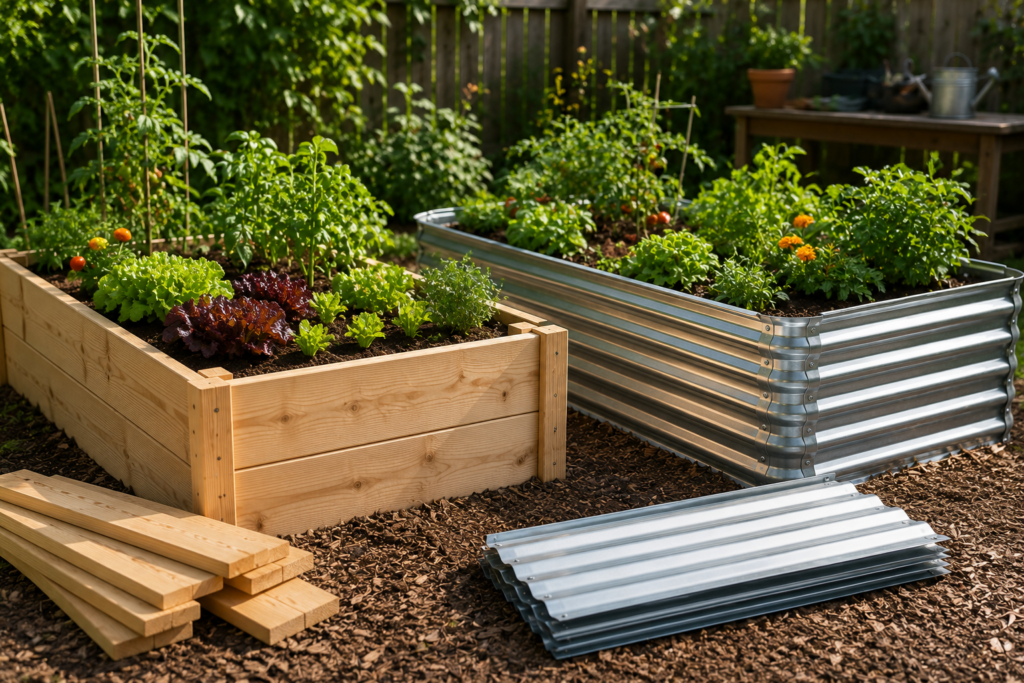
Wood vs. Metal Raised Beds
For a first raised bed, untreated wood is generally the easiest and most forgiving choice. It doesn’t require special tools, it’s simple to fix if you make a building mistake, and it holds up well for several seasons with only basic maintenance.
Galvanised metal is another option worth considering, especially if you plan to garden for many years. Metal beds last much longer and need very little upkeep, though they usually cost more upfront than a simple wooden frame.
| Material | Best for | Lifespan | Upfront Cost |
| Untreated wood | Beginners, first builds | Several seasons | Lower |
| Galvanized metal | Long-term gardeners | Many years | Higher |
If you’re building your first bed, wood is still the more forgiving starting point. Metal is worth the investment once you know raised-bed gardening is something you’ll stick with.
Materials to Avoid
One material to avoid is old pressure-treated lumber of unknown age or reclaimed wood that may have been painted or chemically treated at some point. Since you’re growing food, it’s not worth the risk of not knowing what the wood has been exposed to.
Budgeting for a DIY Raised Bed
Budget-wise, expect to spend somewhere in the range of $80–$200 for a simple DIY wooden raised bed, depending on size and local material prices. You can spend less by reusing materials you already have, or more if you choose premium wood or a ready-made kit. If you’re deciding where to spend your budget, put more of it toward good soil than toward the frame — soil quality will affect your harvest far more than the materials the bed is built from.
Picking the Right Raised Bed Size
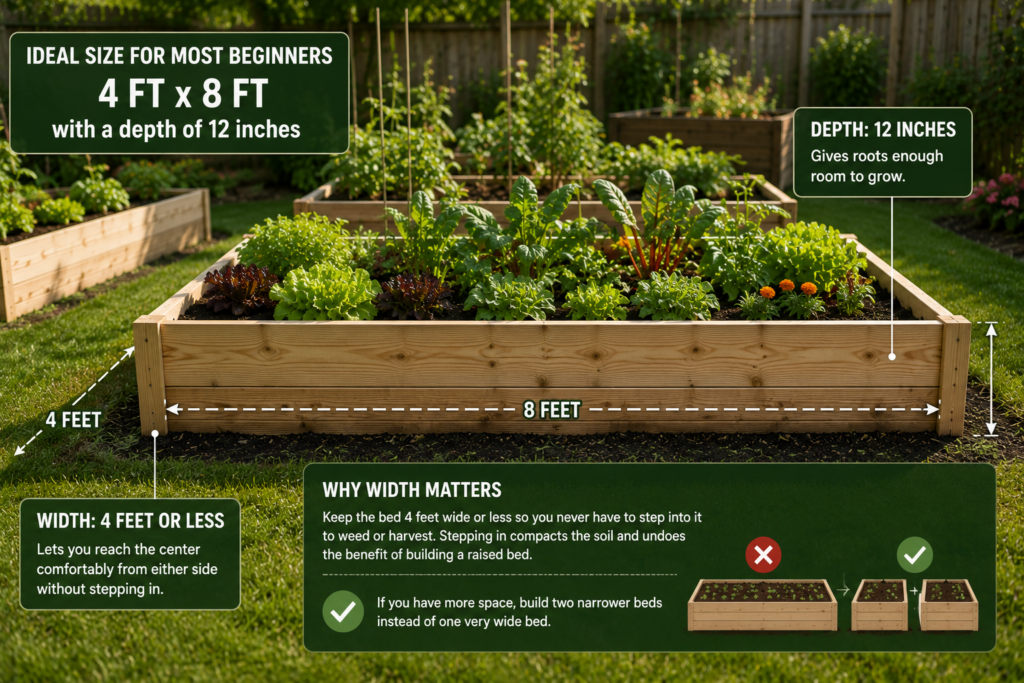
A size of roughly 4 feet by 8 feet, with a depth of around 12 inches, works well for most beginners. That depth gives roots enough room to grow, and that width lets you reach the centre of the bed comfortably from either side.
Width matters more than most beginners expect. Keep the bed to about 4 feet wide or less so you never have to step into it to weed or harvest. Stepping into the bed compacts the very soil you worked to loosen, which undoes a lot of the benefit of building a raised bed in the first place. If you have more space, it’s better to build two narrower beds than one very wide one.
How to Make a Raised Garden Bed: Step-by-Step
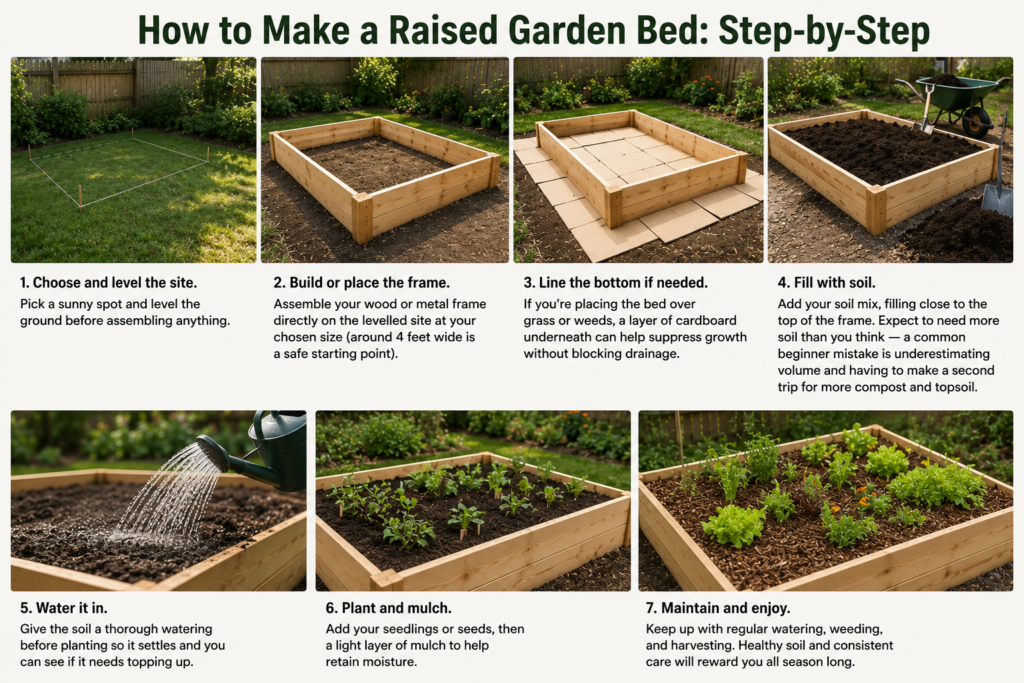
Plant and mulch. Add your seedlings or seeds, then a light layer of mulch to help retain moisture.
Choose and level the site. Pick a sunny spot and level the ground before assembling anything.
Build or place the frame. Assemble your wood or metal frame directly on the levelled site at your chosen size (around 4 feet wide is a safe starting point).
Line the bottom if needed. If you’re placing the bed over grass or weeds, a layer of cardboard underneath can help suppress growth without blocking drainage.
Fill with soil. Add your soil mix, filling close to the top of the frame. Expect to need more soil than you think. A common beginner mistake is underestimating volume and having to make a second trip for more compost and topsoil.
Water it in. Give the soil a thorough watering before planting so it settles and you can see if it needs topping up.
Getting the Soil Mix Right
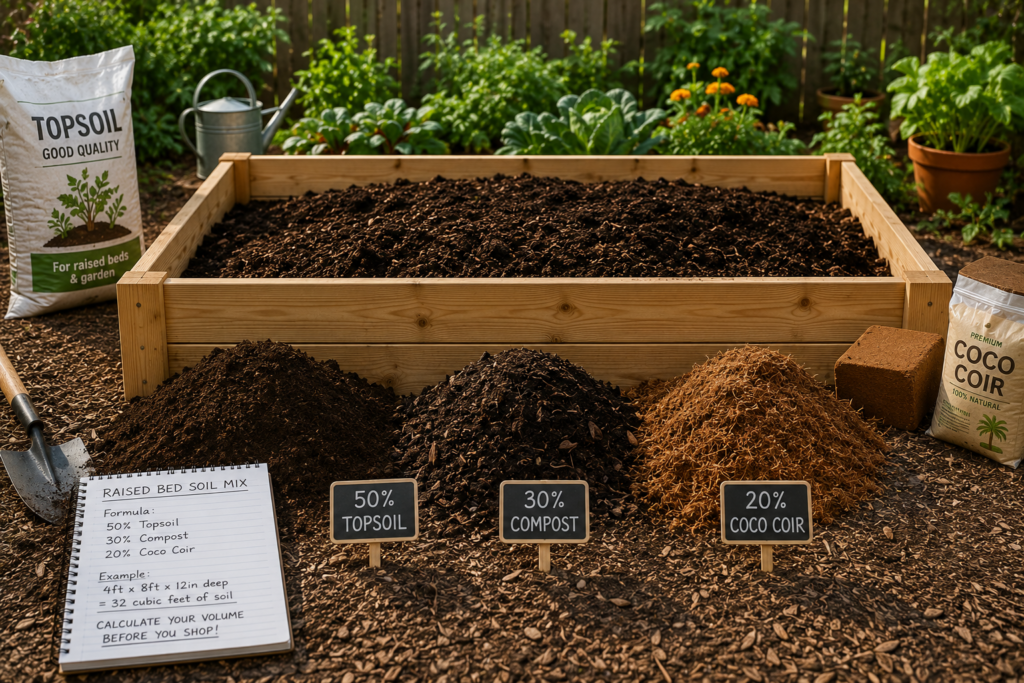
The soil is where most of the real difference happens, and it’s worth getting right. A reliable raised-bed soil mix is roughly 50% good-quality topsoil, 30% finished compost, and 20% coco coir. If the mix feels heavy, a little coarse sand or fine pine bark can improve drainage without overdoing it.
A mistake worth avoiding: filling most of the bed with garden soil and adding only a thin layer of compost on top. It looks fine at first, but within a few weeks that soil tends to compact, drainage becomes uneven, and plants grow noticeably less vigorously. The soil needs to be loose and rich in organic matter all the way through, not just on the surface.
Look for compost that’s well-finished — it should smell earthy and crumbly, not fresh or woody. The specific brand matters less than the quality; what matters is that it’s fully broken down. Each new season, top up the bed with an inch or two of fresh compost rather than replacing the soil entirely. That keeps the bed productive with very little extra work.
Tip: A 4×8-foot bed at 12 inches deep holds around 32 cubic feet of soil — more than most beginners expect. Calculate your volume before you shop so you’re not making a second trip.
What Grows Well in a Raised Bed
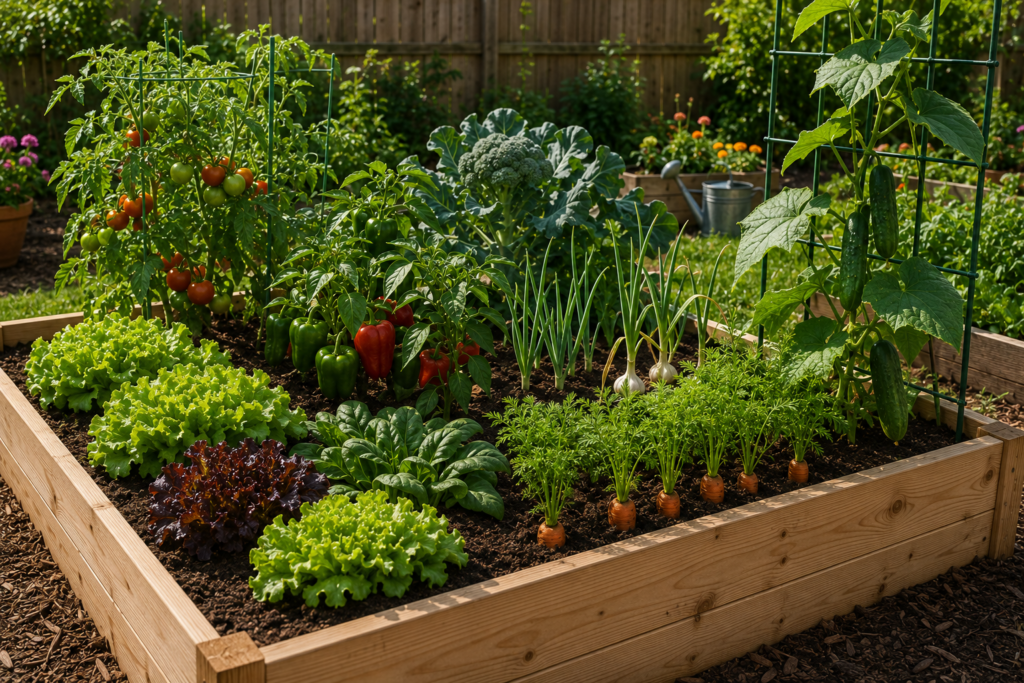
Some crops respond especially well to raised-bed growing. Tomatoes tend to be one of the most reliable choices, thanks to the better drainage and more consistent soil. Peppers, onions, and garlic also do well, and root vegetables like carrots benefit noticeably from the loose soil structure.
Leafy greens such as lettuce and spinach thrive in raised beds too, particularly during cooler months when they’re not stressed by heat. Cucumbers are worth a mention as well — adding a simple trellis next to the bed keeps the vines off the ground, improves airflow, makes harvesting easier, and tends to reduce disease problems.
Timing still matters, even in a raised bed. Broccoli, for instance, needs to go in at the right point in the season — plant it too late, and a stretch of warm weather while the heads are forming can cause them to stay small or bolt early. A raised bed improves your growing conditions, but it doesn’t remove the need to plant at the right time.
Common Raised Garden Bed Mistakes to Avoid
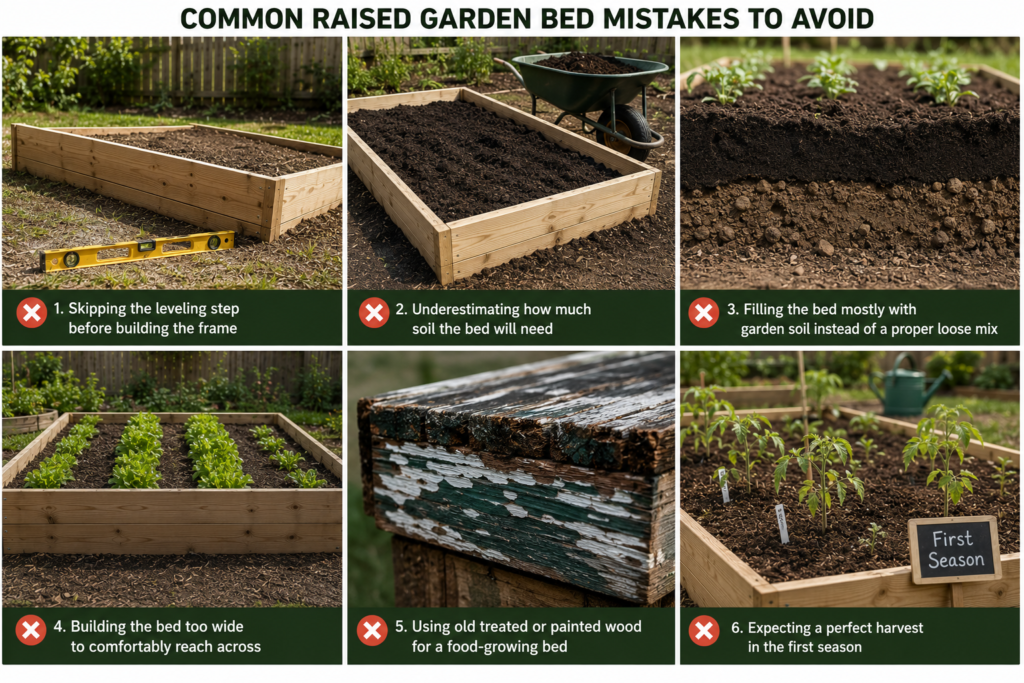
- Skipping the leveling step before building the frame
- Underestimating how much soil the bed will need
- Filling the bed mostly with garden soil instead of a proper loose mix
- Building the bed too wide to comfortably reach across
- Using old treated or painted wood for a food-growing bed
- Expecting a perfect harvest in the first season
That last point is worth sitting with. It’s completely normal to adjust your soil mix, move plants around, or find that some crops do better than others in your first year. A raised bed makes it easier to learn from those adjustments because you’re working with fewer uncontrolled variables than in-ground gardening.
Frequently Asked Questions
How deep should a raised garden bed be? Around 12 inches is a good starting depth for most vegetables, giving roots enough room while keeping the amount of soil needed manageable.
How wide should a raised garden bed be? Keep it to about 4 feet or less so you can reach the middle from either side without stepping into the soil.
What is the best soil mix for a raised garden bed? A dependable mix is roughly 50% topsoil, 30% finished compost, and 20% coco coir, with a little coarse sand or pine bark added if drainage needs improving.
How much soil do I need for a raised garden bed? Multiply length x width x depth in feet to get cubic feet, then convert to your supplier’s units. A 4×8-foot bed at 12 inches deep needs about 32 cubic feet. Plan to buy slightly more than the number suggests.
What’s the cheapest way to make a raised garden bed? Untreated wood is generally the most budget-friendly option, with a simple DIY bed typically costing between $80 and $200 depending on size and materials.
Can I use treated wood for a raised garden bed? It’s best to avoid old pressure-treated or painted wood of unknown history, since you can’t be sure what it’s been exposed to and you’re growing food in it.
Do I need to replace the soil in a raised bed every year? No. Topping up with an inch or two of fresh compost each season is usually enough to keep the soil healthy and productive.
What vegetables grow best in a raised garden bed? Tomatoes, peppers, onions, garlic, carrots, lettuce, spinach, and cucumbers (especially with a trellis) tend to do particularly well.
How do I stop water from pooling in my raised bed? Level the ground before you build the frame. An unlevel base is the most common cause of water collecting in one corner after watering or rain.
Final Thoughts
Learning how to make a raised garden bed isn’t complicated, but a handful of small details make the difference between a bed that struggles and one that performs well season after season. Levelling the ground first, filling it with a proper soil mix from top to bottom, and keeping the width manageable will save you the same headaches I ran into with my first build.
Don’t expect everything to be perfect in your first season; adjusting your soil, your plant choices, and your timing is part of the process. What a raised bed gives you is a much better starting point and far more control than in-ground gardening, and that alone makes it worth building.
The first time I grew a really good batch of onions, I thought the hard part was over once they were out of the ground. The bulbs looked dry, firm, and completely ready to put away. It didn’t take long to learn that harvest is only half the story. A few weeks later, when I checked on them, some had softened, and a few had already pushed out a green shoot at the neck. Nothing about them had looked wrong at harvest time.
That was the moment I stopped treating storage as an afterthought. A healthy-looking onion at harvest doesn’t automatically mean it will keep for months. How you cure it, how you store it, and how often you check on it all make a real difference. Since then, I’ve treated storage as part of growing onions, not something that starts once growing is finished.
Quick Answer: How to Store Onions
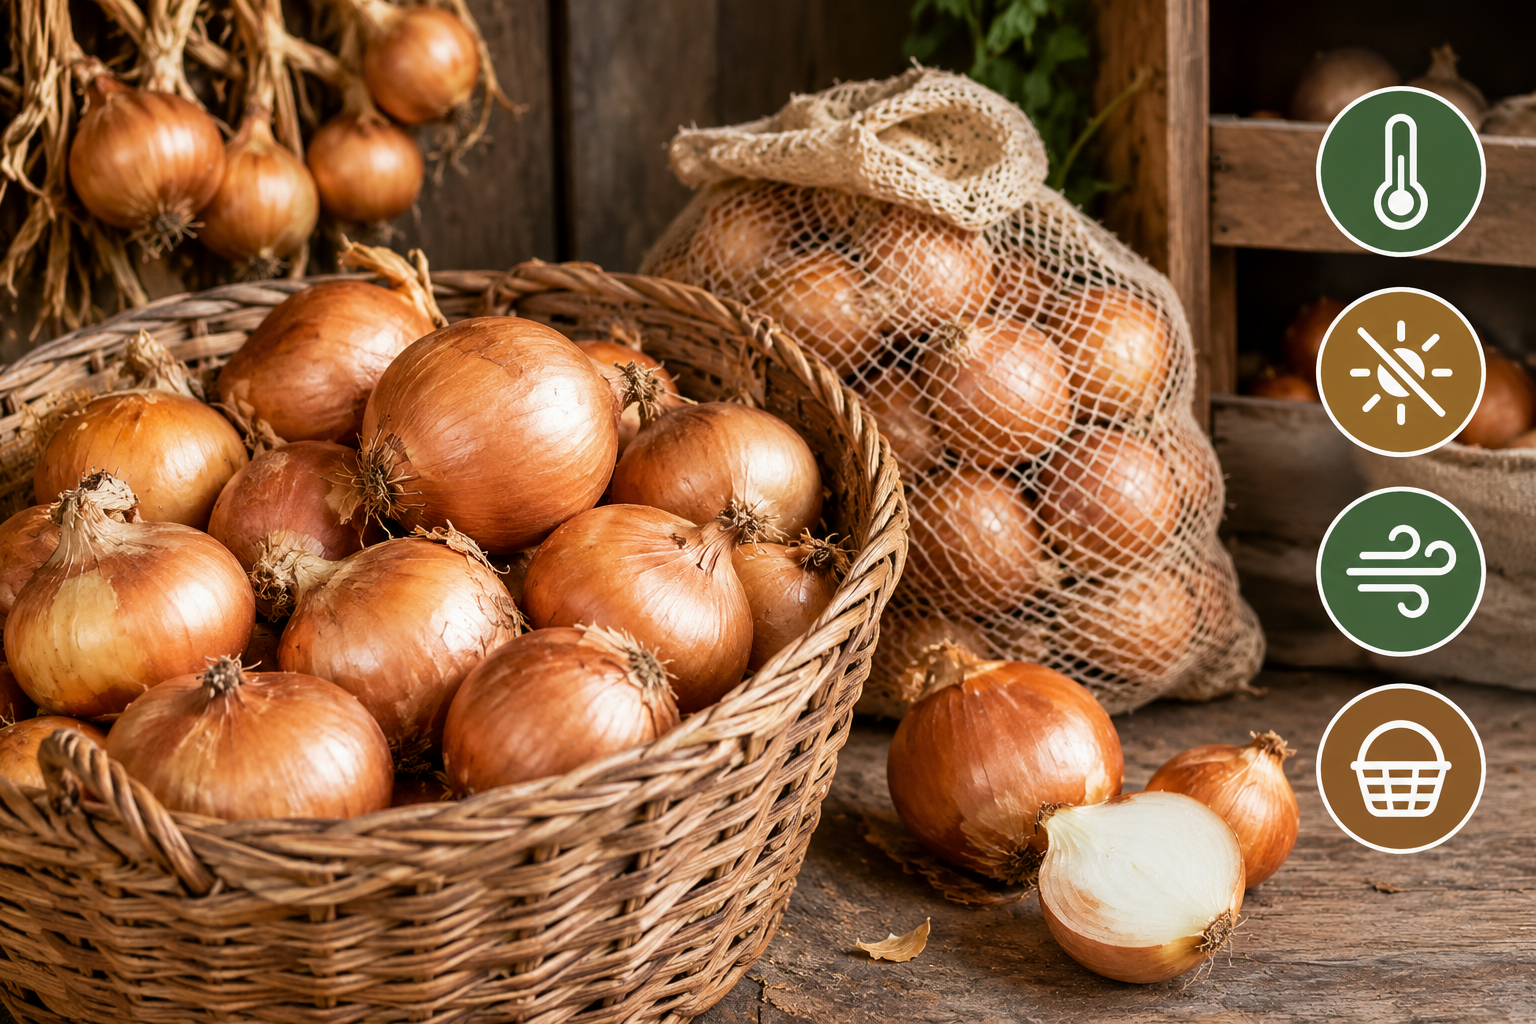
Properly cured onions should be kept whole in a cool, dry, dark, and well-ventilated place. A breathable container, such as a mesh bag or an open basket, works better than anything sealed. Curing comes first: before onions go into long-term storage, the outer skin needs to dry out and the neck needs to dry down properly. Skipping that step is one of the most common reasons onions don’t last.
Why Onion Storage Deserves Its Own Attention
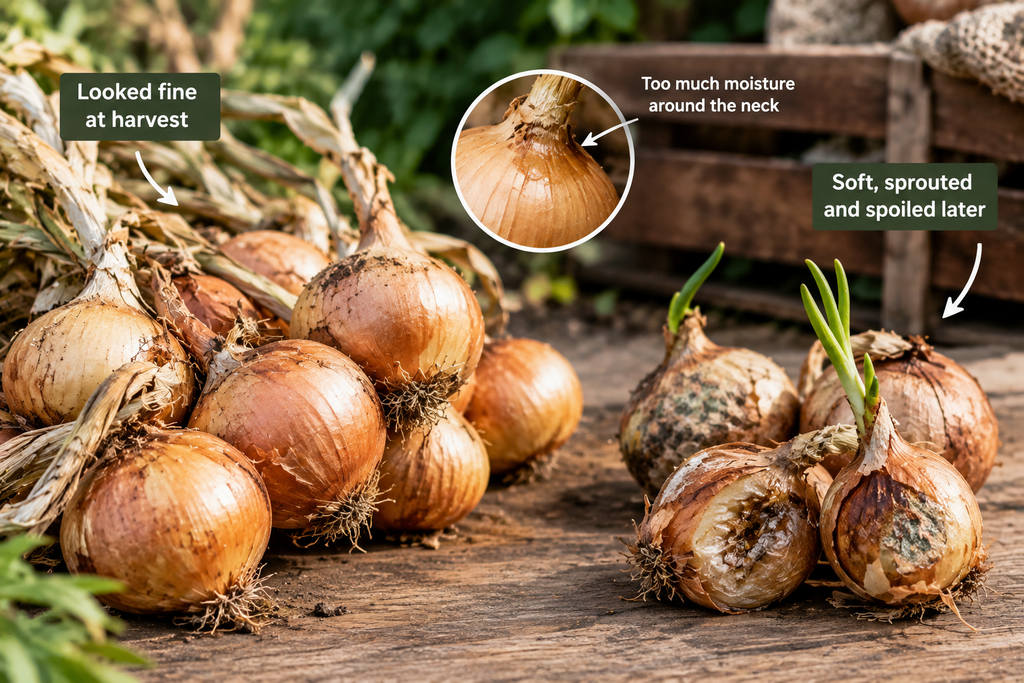
It’s easy to assume that once onions are pulled and the tops have dried a bit, the job is done. I assumed the same thing until I saw otherwise. An onion can look completely fine on the outside and still have too much moisture around the neck or under the outer layers.
What changed for me was realising that curing and storage conditions matter just as much as growing the onions well in the first place. A great harvest can still end up soft, sprouted, or spoilt a few weeks later if it isn’t handled properly afterward.
Curing Onions Properly After Harvest

Curing is the step that’s easiest to rush, and it’s also one of the most important parts of getting onions ready for storage.
Don’t Wash Onions After Harvest
I don’t wash onions after harvesting. Adding moisture right before curing works against the whole point of drying them out. Instead, I gently brush or rub off loose soil by hand and leave the outer skin and tops intact. I also try to handle the bulbs carefully at this stage, since bruised onions tend to cause problems later in storage, even if the damage isn’t obvious right away.
Give Onions Time to Cure
For curing itself, I spread the onions out in a dry, shaded, well-ventilated spot, avoiding deep piles so air can move around them. Crowding them together restricts airflow, and airflow is really what curing depends on. I usually give them a couple of weeks, but I don’t treat that as a strict deadline. Some batches are ready a little sooner; others take longer, so I check the onions themselves rather than just counting days.
Know When Onions Are Properly Cured
I know curing is done when the outer skin feels dry and papery, the neck has dried down and tightened, and the bulb feels firm rather than damp. If the tops still feel fresh or slightly green, or the neck feels soft, I give it more time.
Sorting and Preparing Onions Before Long-Term Storage

Once curing is finished, I go through the whole batch and set aside anything that isn’t holding up well. Onions with soft spots, visible damage, or bulbs that just don’t feel as firm as the rest don’t go into long-term storage with the good ones. It’s tempting to keep everything together, but a soft or damaged onion can create problems for the bulbs stored around it, so I remove questionable ones early.
This is also the point where I separate onions by how I plan to use them, which matters more than it might seem; more on that below.
How to Store Onions Long Term
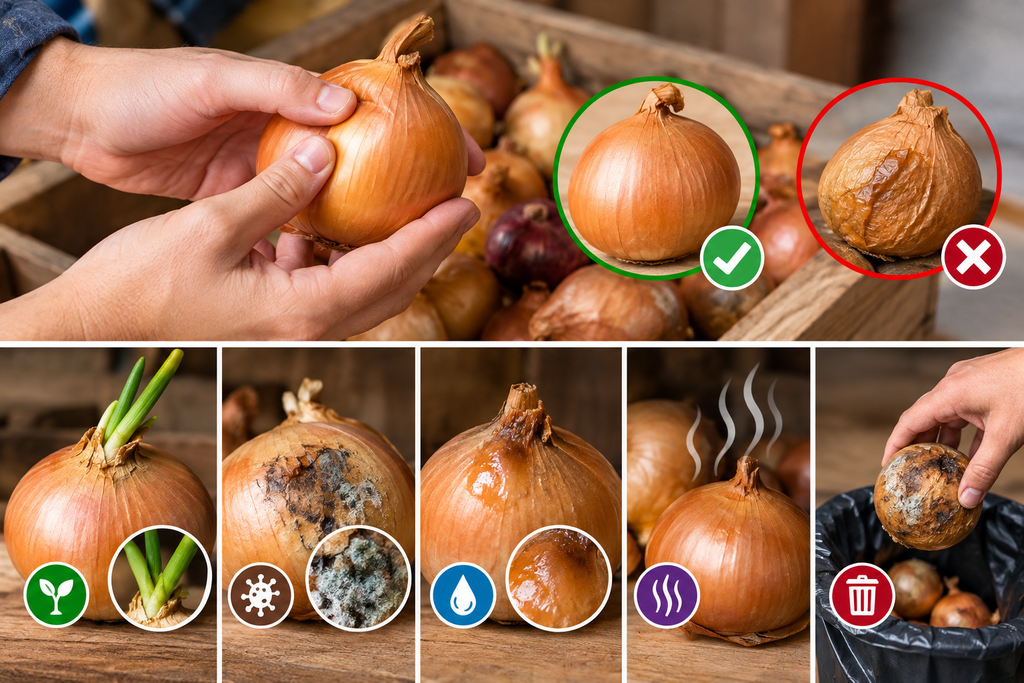
For long-term storage, I keep cured onions somewhere cool, dry, dark, and well ventilated. The container matters more than people often expect. I prefer something breathable, like a mesh bag or an open basket, rather than anything sealed.
Avoid Plastic Bags
Plastic bags are one thing I avoid. In my experience, they trap moisture around the bulbs instead of letting it escape, and that trapped moisture works against everything curing is meant to achieve. I’d rather deal with slightly less tidy storage than risk that.
Keep Onions Away From Excess Moisture
I also don’t refrigerate a whole batch of cured onions for long-term keeping. A cool, dry, dark space with good airflow has worked better for me than relying on the fridge for a whole batch. And I keep onions separate from potatoes rather than storing different crops together. Both need their own approach to moisture, and I haven’t seen any real benefit to piling them in with each other.
Allow Good Airflow
Beyond the container and location, I avoid packing onions in tightly. Good airflow between the bulbs is just as important once they’re in storage as it was during curing.
Sweet Onions vs. Storage Onions
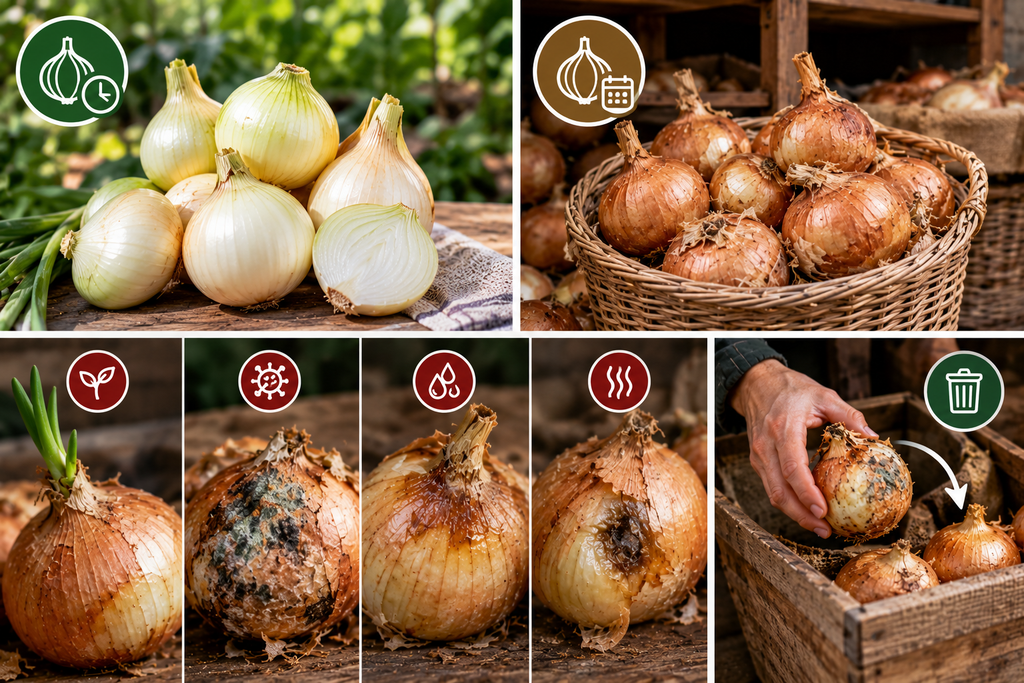
Not every onion keeps the same way, and that’s something I’ve learned to plan around rather than ignore. Sweet onions generally don’t store as long as firmer storage varieties. Because of that, I tend to use sweeter onions earlier and save the firmer, better-curing bulbs for longer-term storage.
This isn’t about one type being better than the other; it’s about matching how you use each batch to how well it actually keeps. Sorting onions this way when you put them away saves you from discovering later that the wrong ones were spoilt first.
Warning Signs to Watch For

Checking stored onions periodically has become a habit rather than an extra chore. When I go through them, I’m mainly feeling for firmness. A healthy onion should still feel solid, so noticeable softness, especially around the neck, is usually the first sign something is off.
Signs an Onion Is Going Bad
Beyond that, I watch for:
- Sprouting, especially a green shoot pushing through the neck
- Mould or visible dark, discoloured patches
- A damp feel around the neck or body
- Any unusual or unpleasant smell
If I find one that’s clearly going bad, I remove it right away.
Common Onion Storage Mistakes

Most of the onion storage problems I’ve run into trace back to a handful of habits, not bad luck:
Skipping or Rushing Curing
An onion can look perfectly fine on the outside and still have a neck or skin that hasn’t dried properly. That gap between appearance and actual readiness is what caught me off guard the first time.
Using Plastic Bags
They seem convenient, but the lack of airflow tends to create more problems than it solves.
Refrigerating the Whole Batch
It might seem like the safest option, but for long-term storage I’ve had better results with a cool, dry, well-ventilated space instead.
Storing Onions and Potatoes Together
Both crops need conditions that manage moisture carefully, and I haven’t found a good reason to combine them.
Assuming a Good-Looking Onion Is Storage-Ready
This is really the core lesson behind all of this. Appearance right after harvest isn’t a reliable sign of how well an onion has cured.
None of these fixes require anything complicated. Proper curing, dry and airy conditions, and checking in on the batch occasionally have mattered far more for me than any special trick or product.
Frequently Asked Questions About Storing Onions
How Do You Cure Onions Before Storing Them?
Spread them out somewhere dry, shaded, and well ventilated for a couple of weeks, and judge by the bulbs rather than the calendar. They’re ready when the skin is papery and the neck has dried down.
Should Onions Be Washed Before Storage?
No, just brush off loose soil. Washing adds moisture right when you want the onions drying out.
What Is the Best Container for Storing Onions?
Something breathable, like a mesh bag or open basket, rather than anything sealed.
Can You Store Onions in the Refrigerator?
For a whole batch of cured onions, I prefer a cool, dry, well-ventilated storage space rather than the refrigerator.
Can Onions and Potatoes Be Stored Together?
Better kept separate. Neither crop benefits from being piled in with the other.
How Do You Know When an Onion Has Gone Bad?
Softness, dampness near the neck, sprouting, mould, dark patches, or an off smell are the signs to watch for. Pull a questionable onion right away.
How Long Can Properly Stored Onions Last?
Several months with proper curing and good conditions, though it varies from bulb to bulb and by variety, is not a guarantee for every onion.
Final Thoughts
If there’s one thing I’d want other home gardeners to take from this, it’s that onion storage really starts at harvest, not after it. Onions that look completely ready can still need proper curing before they’re fit for long-term storage.
Getting that part right, keeping the storage space dry and well ventilated, choosing the right onions for longer keeping, and checking in on them now and then has made a bigger difference for me than any storage trick ever has. Growing a good batch of onions is only part of the work; looking after them afterward is what makes that harvest actually last.
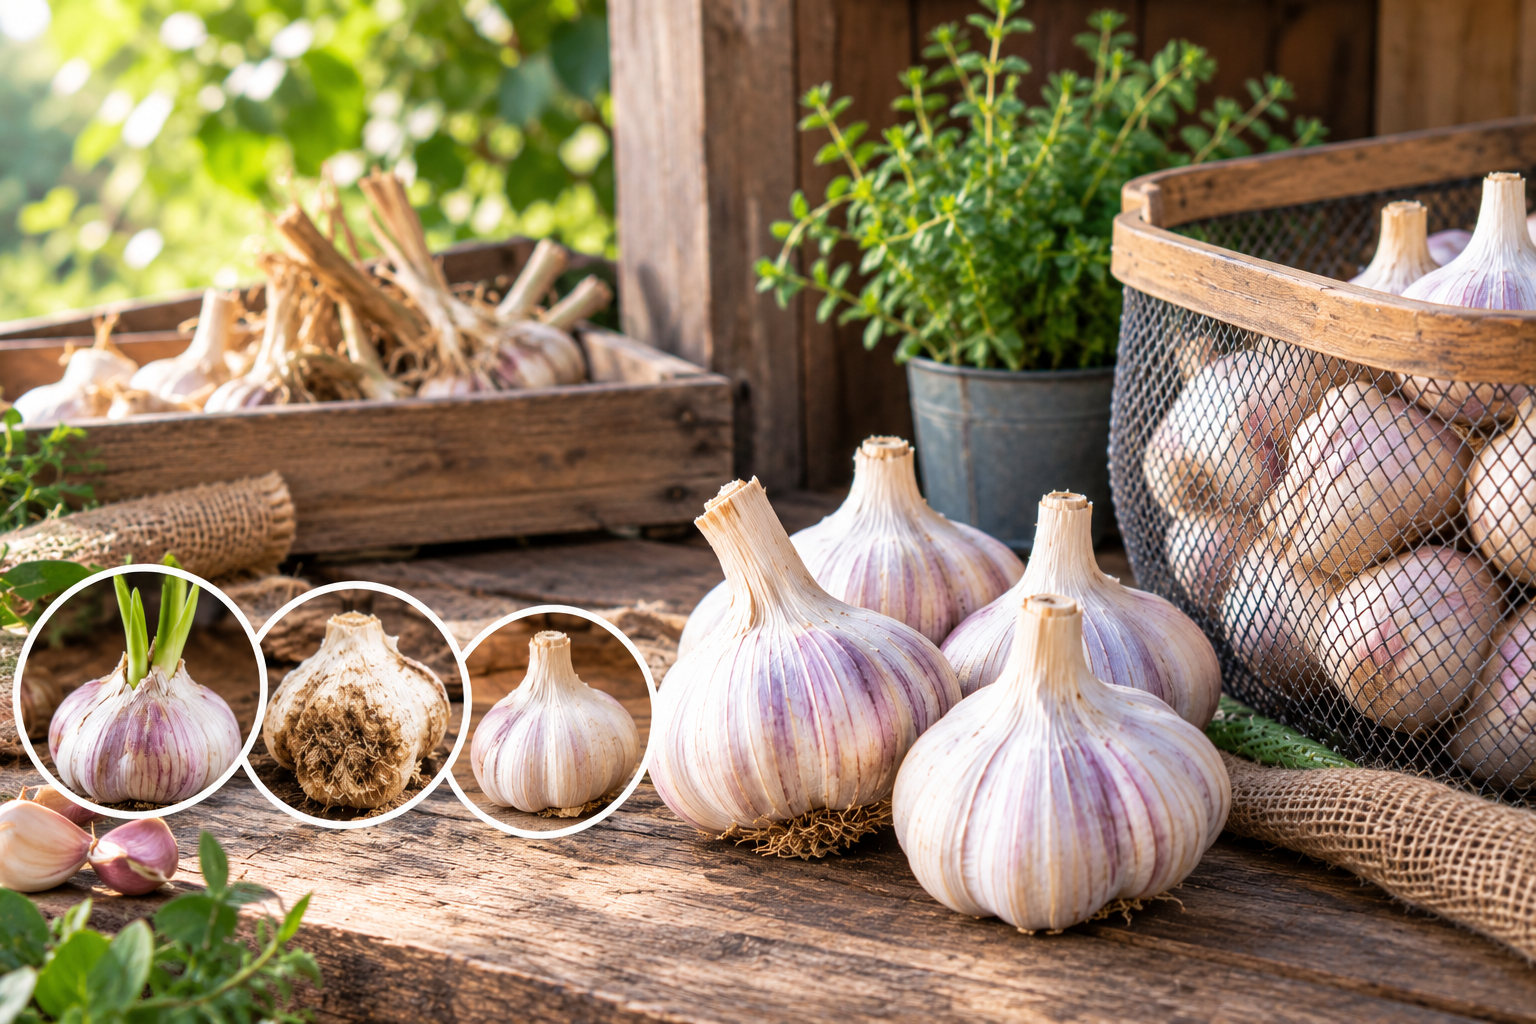
I used to think growing garlic was the hard part. Get it in the ground, wait out the season, and pull the bulbs down. Then one year I harvested a batch that looked perfect – firm, papery skins, nice heavy bulbs – and a few weeks later I found some of them going soft while others had already started sprouting.
That was the moment I realised storing garlic properly isn’t an afterthought. It’s its own part of the process, right alongside growing and harvesting. Curing, moisture, airflow, and where you actually keep the bulbs all make a real difference in how long garlic lasts. Once I started paying attention to those things instead of assuming garlic would just take care of itself, my storage results changed completely.
If you’ve grown or bought more garlic than you can use right away and want it to actually last, here’s what has worked for me.
Quick Answer: How to Store Garlic
Cure freshly harvested garlic in a dry, shaded, well-ventilated spot for about 2–3 weeks before storing it. Once cured, keep the bulbs whole in a breathable container; a mesh bag or open basket works well in a cool, dark, dry place with good airflow. Avoid plastic bags, avoid the fridge for long-term storage of your whole supply, and check the bulbs occasionally so you can catch any softening or sprouting early. Handled this way, garlic typically stores well for several months.
Why Garlic Storage Deserves Its Own Attention
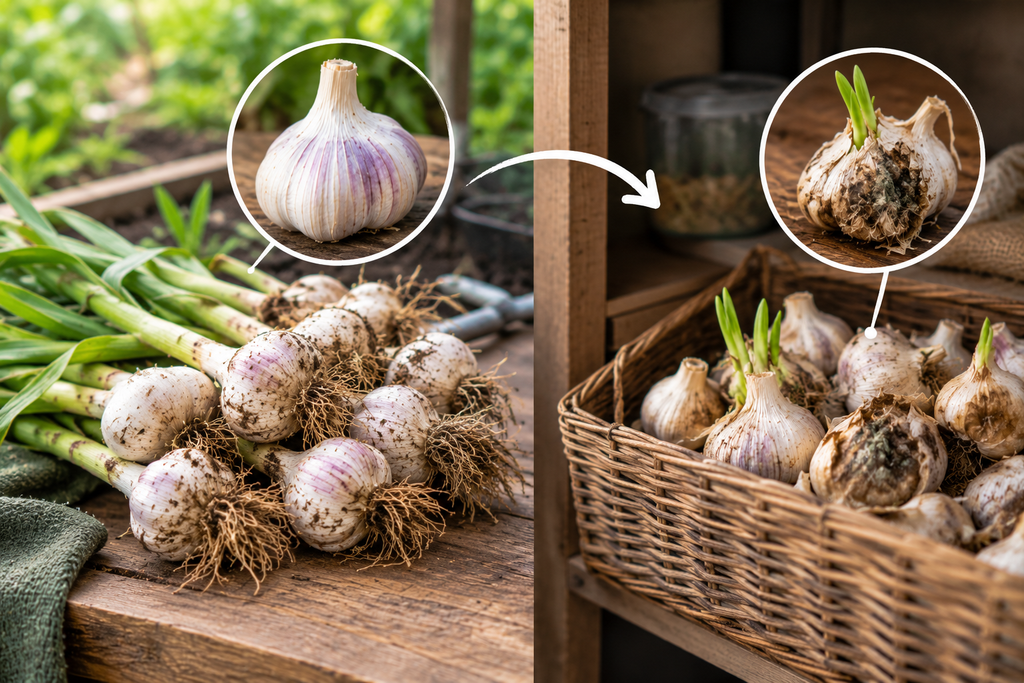
It’s easy to assume that once garlic is out of the ground, the hard part is over. I assumed the same thing. But garlic that looks healthy at harvest can still go bad in storage if it wasn’t cured properly or if it’s kept somewhere too damp or too warm.
The bulbs I lost weren’t damaged when I brought them in. They looked completely fine. What went wrong happened afterward in how I stored them, not how I grew them. That’s really the core lesson behind this whole article: a good harvest can still be wasted if you don’t know how to look after it once it’s out of the garden.
Curing Garlic Before Storage
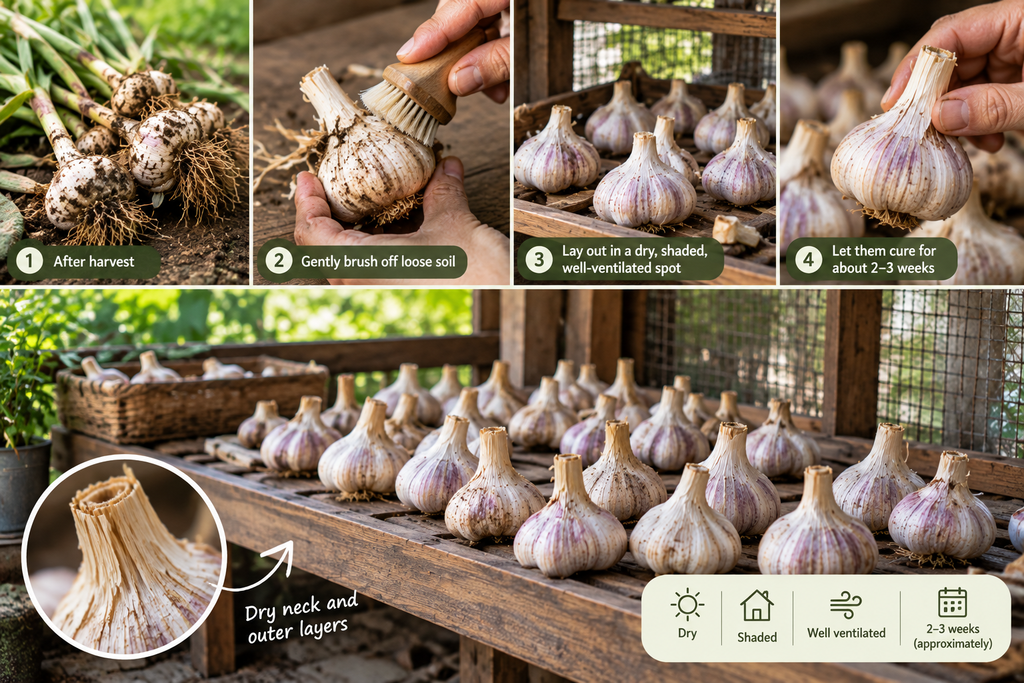
Curing is the step that made the biggest difference for me, and it’s also the one that’s easiest to rush.
After harvest, I try not to handle the bulbs more than necessary. I don’t wash them; adding moisture right when you’re trying to dry garlic out works against you. Instead, I gently brush off any loose soil and leave the outer skin intact, since that papery layer is part of what protects the clove inside.
Then the bulbs go somewhere dry, shaded, and well ventilated to cure, not straight into a storage container. I lay them out so air can move around them and leave them there for roughly two to three weeks. I say “roughly” because I’ve stopped relying on a strict day count. Some batches are ready a little sooner, some take a bit longer, so I check on them periodically and judge by how dry the outer layers and necks feel rather than crossing days off a calendar.
Curing dries out the neck and outer wrappers and gets the bulbs ready for long-term storage. It also gives any minor damage a chance to show itself before you commit a bulb to storage.
Preparing Garlic for Long-Term Storage

Once the garlic is fully cured, there’s a bit more prep before it goes into storage.
I trim the roots and cut the tops down, leaving a small amount of stem above the bulb rather than cutting flush against it. Then I go through the whole batch by hand and sort it — anything soft, bruised, or damaged gets set aside. Only firm, healthy bulbs go into long-term storage. A soft or damaged bulb can create problems for the bulbs around it, so I prefer to sort them before storage.
This sorting step is one I’d genuinely encourage people not to skip. It’s tempting to lump everything together, especially with a big harvest, but a single soft bulb sitting against healthy ones is exactly the kind of thing that causes problems weeks later.
Where and How to Store Cured Garlic

For actual storage, I keep cured garlic in a cool, dry, dark place with good airflow. The container matters here; I use something breathable, like a mesh bag or an open basket, rather than anything sealed. Sealed containers trap moisture, and excess moisture is really the enemy throughout this whole process, from curing to long-term storage.
I also like to keep the garlic somewhere I’ll actually see it, instead of tucking it away in a cupboard and forgetting about it. That’s partly practical – checking on it is easier when it’s not buried – and partly because “out of sight, out of mind” is exactly how I ended up with sprouted bulbs in the first place.
I keep the garlic away from direct light and heat and avoid places that are warm or damp. A dark corner of a pantry, cupboard, or similar space works better than a kitchen counter.
What I’ve Learned Doesn’t Work
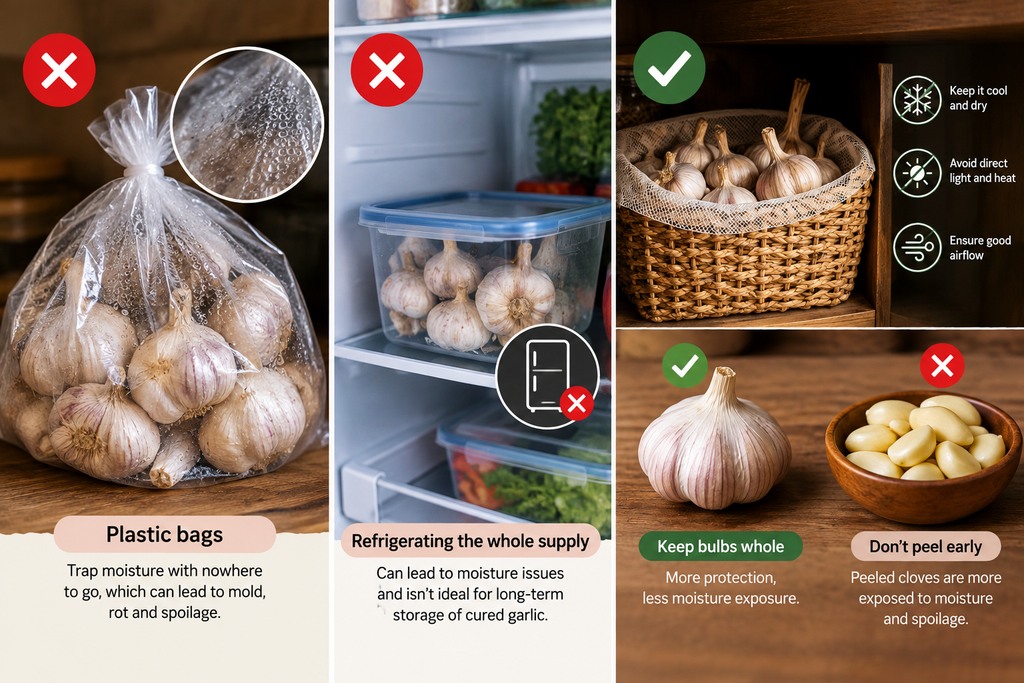
Two things I tried early on that didn’t hold up:
Plastic bags. I stored garlic in plastic bags before switching to breathable containers, and it wasn’t a good long-term option. Moisture builds up inside the bag with nowhere to go, and that’s the opposite of what cured garlic needs.
Refrigerating the whole supply. I don’t refrigerate my full batch of cured garlic. A cool, dry, well-ventilated spot outside the fridge has worked better for me for storing bulbs long-term. The fridge has its uses for garlic in other contexts, but it’s not where I keep the bulk of a stored harvest.
I also don’t peel cloves ahead of time to save effort later. Once garlic is peeled, it’s much more exposed to moisture and spoilage. I keep bulbs whole and only peel cloves when I’m actually about to use them.
Checking Stored Garlic Along the Way
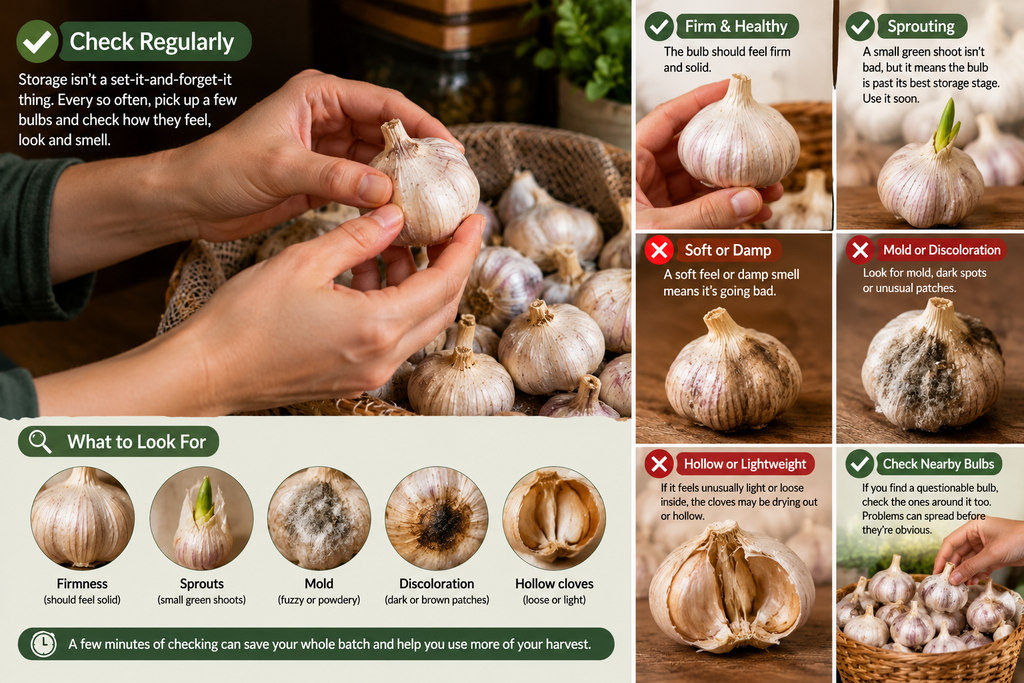
Storage isn’t something I set up once and then ignore. Every so often, I pick up a few bulbs from the container and check how they feel.
A healthy bulb should still feel firm. If one feels noticeably soft or has a damp or unpleasant smell, I pull it out. Sprouting is another thing I watch for; a small green shoot doesn’t automatically mean the bulb has gone bad, but it does mean that one is moving past its best storage stage, so I set it aside to use soon rather than leaving it in with the rest.
I also keep an eye out for mould, dark or discoloured patches, and bulbs that feel unusually light or loose inside, which can be a sign the cloves have started to dry out or hollow. If I find a questionable bulb, I don’t just remove it and move on; I check the bulbs around it too, since problems can start spreading before they’re obvious.
This habit takes a few minutes here and there, but it’s made a real difference in how much of a batch I actually get to use, compared to storing garlic and forgetting about it until something looks wrong.
How Long Stored Garlic Actually Lasts
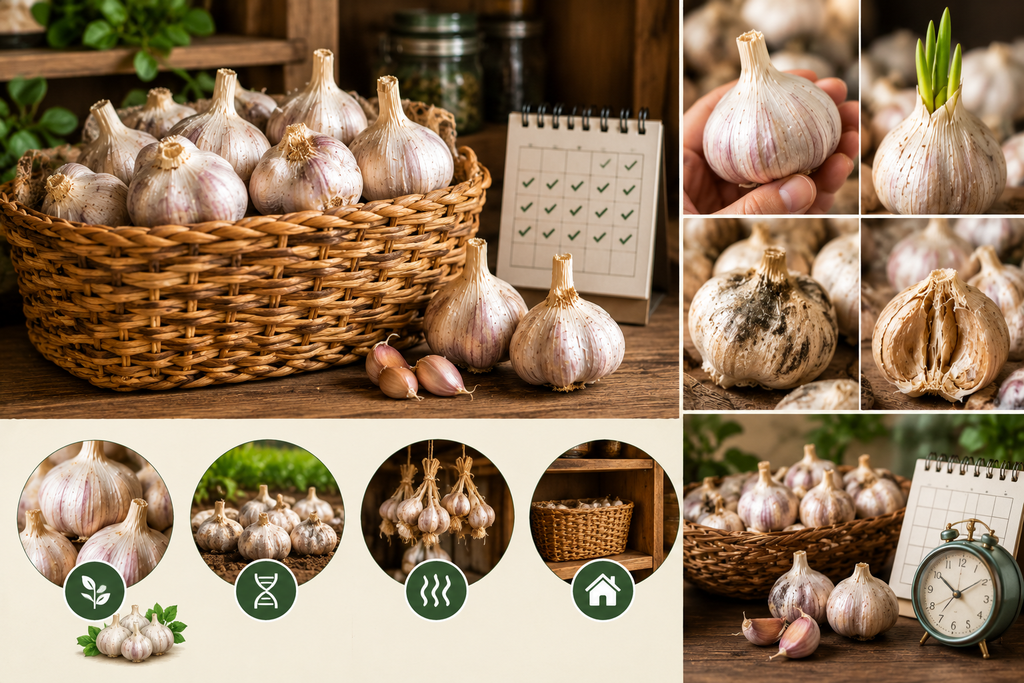
In my experience, properly cured and stored garlic keeps well for several months, though not every bulb lasts exactly the same amount of time. Some hold up longer than others, so I don’t rely on a fixed timeline. Instead, I judge by how the bulbs look and feel as they age, using the signs described above.
How long your own garlic lasts will depend on things like the variety you’re growing, how well it was cured, and the specific conditions you’re storing it in, so treat “several months” as a general expectation rather than a guarantee.
Frequently Asked Questions
Do I need to wash garlic before storing it?
No. Brush off loose soil instead, and leave the outer skin intact; washing adds moisture you don’t want.
How long should garlic cure before storage?
Around two to three weeks in a dry, shaded, well-ventilated spot, checking dryness rather than going strictly by day count.
Can I store garlic in the refrigerator?
You can, but for a whole cured supply, a cool, dry, well-ventilated space outside the fridge has worked better in my experience.
Is it okay to store garlic in plastic bags?
Not for long-term storage: plastic traps moisture, which can lead to soft spots sooner than a breathable container would.
Should I peel garlic ahead of time to make storage easier?
No. Peeled cloves are more exposed to moisture and spoilage. Keep bulbs whole and peel only what you need when you need it.
How do I know if a stored bulb has gone bad?
Watch for softness, an unpleasant or damp smell, mould, dark spots, or a bulb that feels unusually light or hollow. Sprouting means it’s past its best stage, even if it isn’t spoilt yet.
Final Thoughts
The biggest shift for me wasn’t learning some special storage trick; it was realising that storage starts the moment garlic comes out of the ground, not once it’s tucked away somewhere. Proper curing, keeping excess moisture away, using a breathable container, and checking on the bulbs now and then have mattered far more than anything complicated. If you get those basics right, a good garlic harvest doesn’t have to turn into a rush to use it all before it spoils.
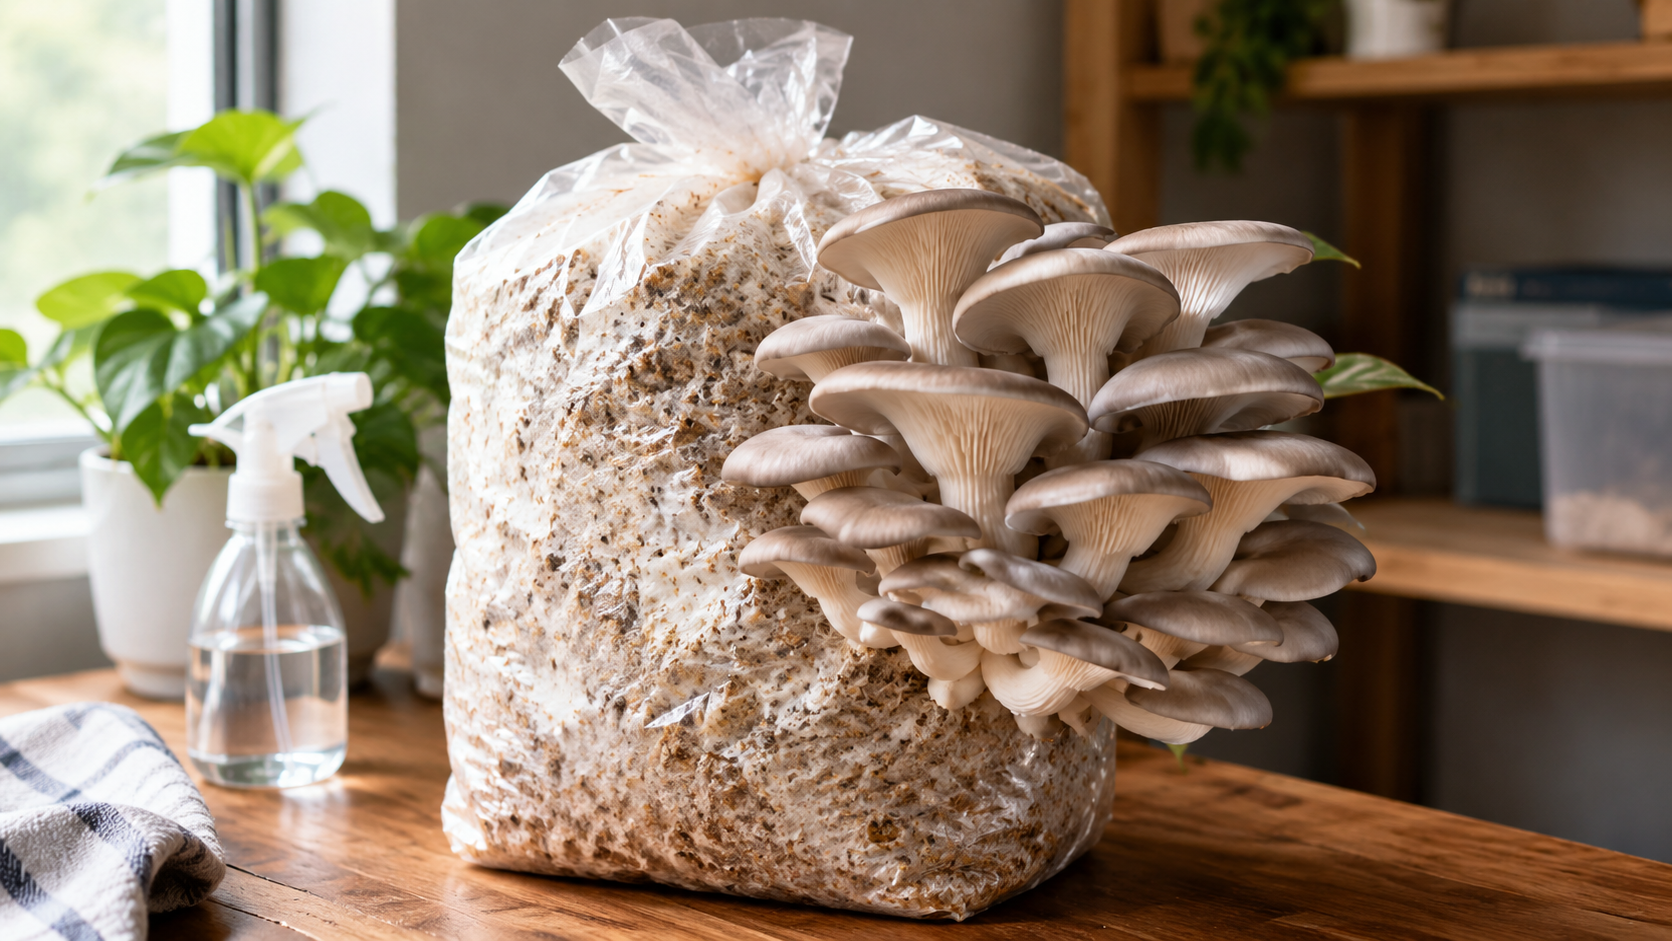
I’ve spent a fair amount of time growing vegetables, and mushrooms felt like something that didn’t follow the usual rules of soil, sunlight, and watering. They seemed like a completely different challenge, and I was curious whether I could actually grow something edible indoors, without a traditional garden bed at all. That curiosity is what led me to a simple oyster mushroom grow bag, and it turned out to be one of the more interesting things I’ve grown at home.
If you’ve never grown mushrooms before, or you tried a grow kit once and didn’t get the results you hoped for, this guide walks through exactly what worked for me and what I’d tell a beginner to focus on.
Quick Answer: How to Grow Mushrooms at Home
The simplest way to grow mushrooms at home is to start with a ready-made mushroom grow bag (oyster mushrooms are a good beginner choice), keep it indoors away from direct sunlight, and maintain a balance of humidity, fresh air, and steady temperature. Mist the growing area when it looks like it needs moisture rather than on a strict schedule, and harvest once the caps have opened but are still firm. With the right conditions, a single bag can often produce more than one harvest, or “flush”.
That’s the short version. Here’s how it actually plays out step by step.
Why Mushrooms Are Different From Vegetables
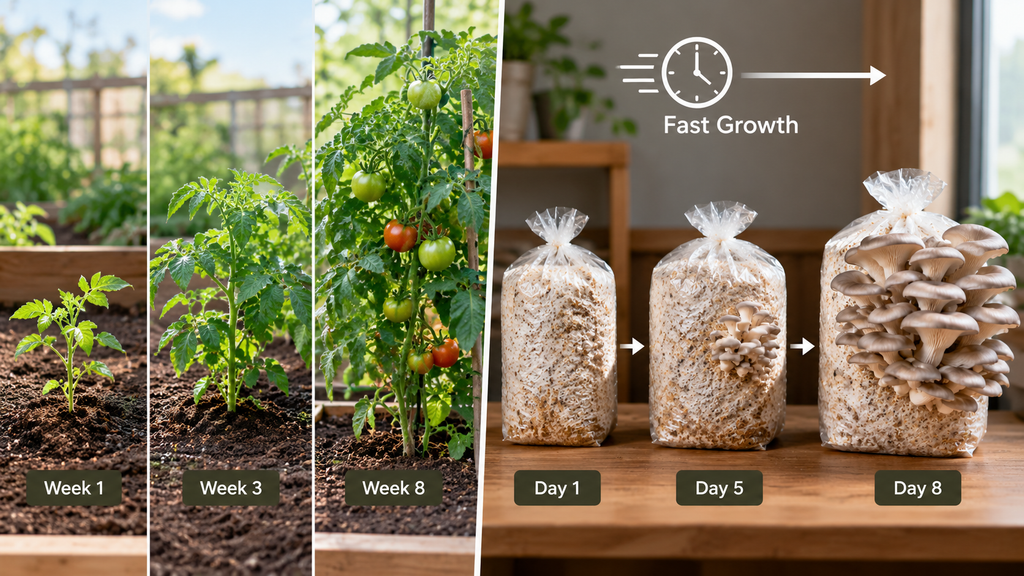
With vegetables, you’re usually watching gradual changes over weeks or months. Mushrooms don’t work that way. One day there’s barely anything to see on the bag, and then within what feels like no time, clusters are noticeably larger. That fast, almost sudden growth is part of what makes mushroom growing feel so different and, honestly, part of what makes it fun to check on.
This also means mushrooms respond quickly to their environment. Get the conditions right, and you’ll see it. Get them wrong, and you’ll see that too, usually faster than you would with a vegetable plant.
Step-by-Step Guide: 7 Steps to Growing Mushrooms at Home
Step 1: Choose a Simple Grow Bag to Start

You don’t need a complicated setup to grow mushrooms at home. I started with an oyster mushroom grow bag specifically because it felt like the simplest way to learn without overcomplicating things. Oyster mushrooms are a common recommendation for beginners because they tend to be forgiving and grow well in a range of home conditions.
There’s a lot of information out there about specialised equipment and precisely controlled environments for mushroom cultivation, and while that has its place for more advanced growing, it can make the whole idea feel intimidating before you’ve even started. A basic grow bag is a reasonable way to see how the process works firsthand.
Step 2: Find the Right Spot Indoors
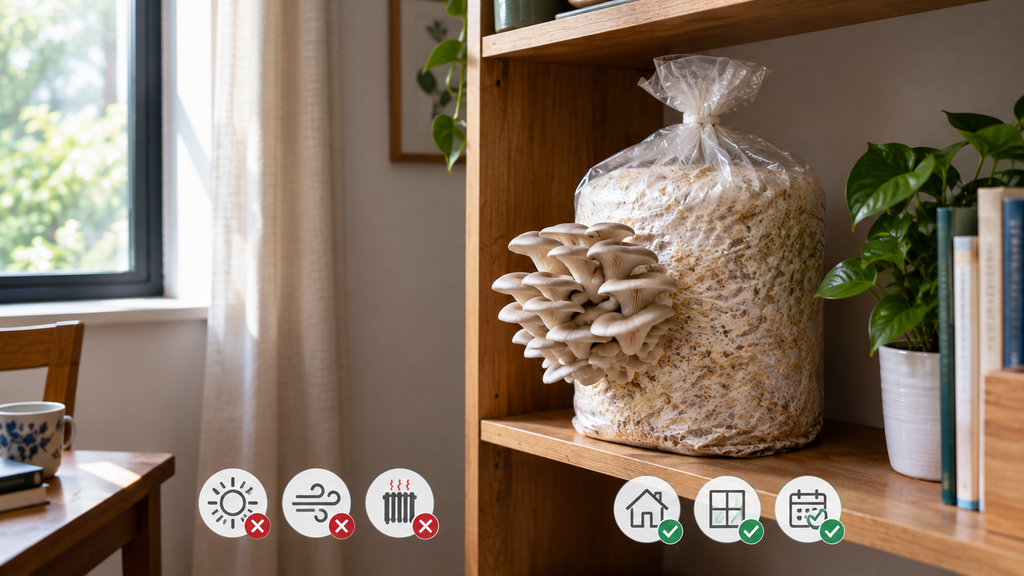
I kept my grow bag indoors, in a clean spot away from direct sunlight. Mushrooms don’t need direct sunlight the way vegetables do, so you’re not looking for a bright, sunny windowsill. Direct sun can dry out the growing surface or overheat the bag. That said, some indirect, natural ambient light in the room can be useful once mushrooms start fruiting, so a fully dark closet isn’t necessary either. A spot with stable conditions, out of direct sunlight, and away from drafts or heat sources is generally a good starting point.
Try to pick somewhere you’ll actually walk past regularly. Checking in on the bag daily makes it much easier to notice changes early, whether that’s the surface drying out or the first signs of pins forming.
Step 3: Understand Moisture Needs (Without Overdoing It)
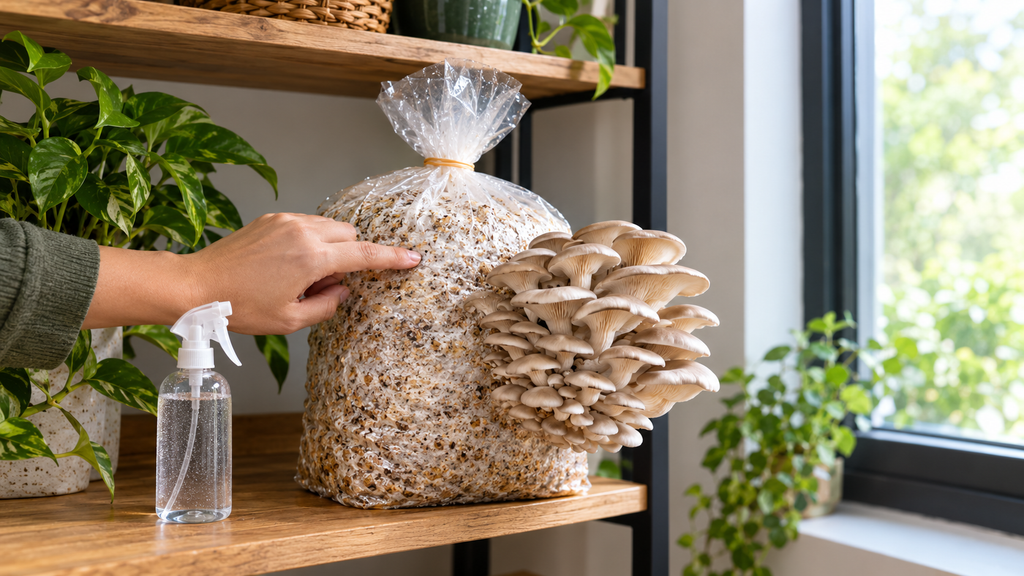
This is the part I got wrong at first. I assumed that keeping the surface very damp would automatically mean better growth, so I was a little too enthusiastic with misting early on. What I learned is that mushrooms need humidity but not a constantly soaked environment. Too much moisture combined with poor airflow isn’t helpful and can actually work against you.
Rather than misting on a strict schedule, it’s more useful to check the surface and mist when it actually looks like it needs moisture. The condition of the growing environment tells you more than a fixed routine ever will.
Step 4: Pay Attention to Airflow

Early on, I was mostly focused on keeping things humid, and I didn’t think much about airflow until the mushrooms actually started developing. That’s when I realised fresh air matters just as much as moisture. A humid environment with no airflow tends to feel stagnant and overly wet, which isn’t the balance you’re after.
You don’t need a complex ventilation setup for a home grow bag, and this isn’t about pointing a fan directly at it or leaving it somewhere drafty. It’s more about avoiding a sealed-off, stagnant spot. Simply allowing some gentle, natural air exchange in the room the bag is kept in makes a noticeable difference.
Step 5: Keep Temperature Fairly Steady

I kept the bag in one spot rather than moving it around and tried to keep the temperature fairly consistent. Mushrooms, like most living things, don’t respond well to constant fluctuation. A steady, moderate indoor temperature, out of direct sun and away from heating vents or cold drafts, gave the bag a stable environment to develop in.
Step 6: Watch the Mushrooms, Not the Clock

If there’s one habit that made the biggest difference for me, it’s this: check on the mushrooms and the growing surface itself, rather than trying to control every variable on a fixed schedule. Growth can look slow and then suddenly pick up. Instead of assuming something is wrong or immediately adjusting things, it’s worth observing for a day or two and letting the mushrooms show you what they need.
That shift, from trying to control everything to just observing and adjusting, is honestly what made the whole process feel manageable instead of stressful.
Step 7: Harvest at the Right Time
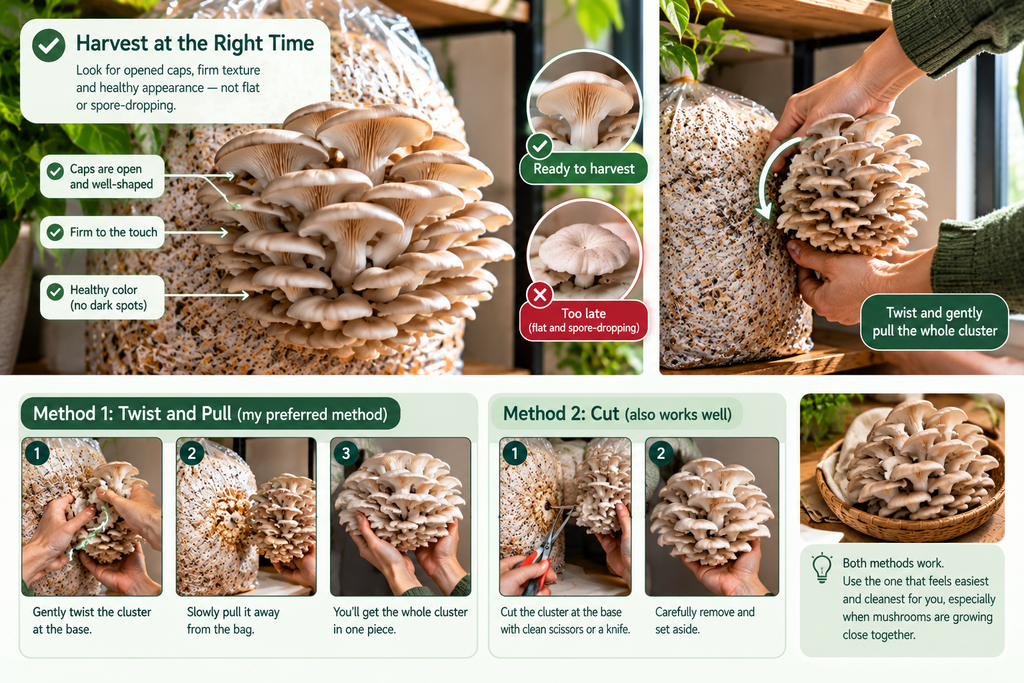
I knew the mushrooms were ready when the caps had opened out but were still firm and healthy-looking, rather than waiting until they went completely flat or started dropping spores. Judging by shape and feel worked better for me than trying to count exact days.
There’s more than one way to harvest, but for me, twisting and gently pulling the whole cluster away from the bag worked better than cutting individual mushrooms one at a time. It was simply the method I found easiest and cleanest, especially when several mushrooms were growing close together. You may find cutting works just as well for you, so it’s worth trying a method and seeing what feels natural.
Common Mistakes to Avoid
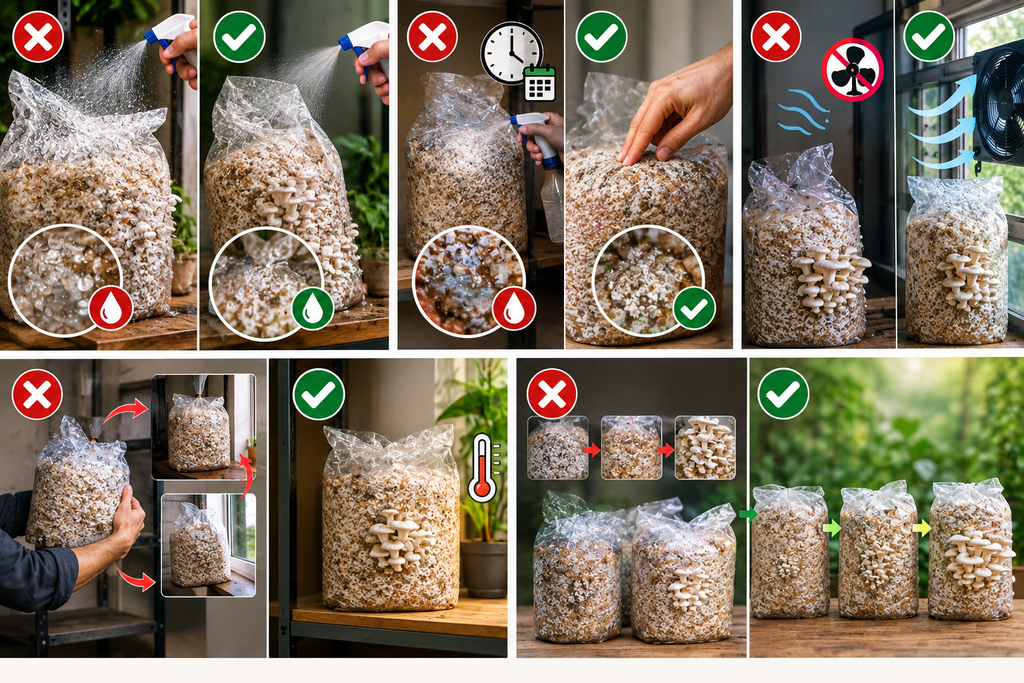
- Over-misting out of enthusiasm. More moisture doesn’t automatically mean better growth. A soggy environment with poor airflow can do more harm than good.
- Misting on a rigid schedule. Checking the actual condition of the growing surface is more useful than misting just because a set amount of time has passed.
- Ignoring airflow. It’s easy to focus only on humidity and forget that fresh air matters just as much.
- Moving the bag around too much. A steady spot with consistent temperature is more helpful than switching locations.
- Expecting daily dramatic changes. Growth can look slow, then suddenly speed up. That’s normal, not a sign something’s wrong.
What Happens After the First Harvest? Getting a Second Flush

After harvesting my first flush, I didn’t expect much else from the bag, but I kept up the same routine of checking moisture and airflow rather than assuming the bag was finished. Sure enough, it produced a second flush.
The second flush was smaller and a bit less uniform than the first, with fewer mushrooms overall. Still, getting any second harvest from the same bag felt like a nice bonus, and it reinforced that consistent, ongoing care (not just the initial setup) is what keeps a bag productive.
Beginner Tips and Common Myths
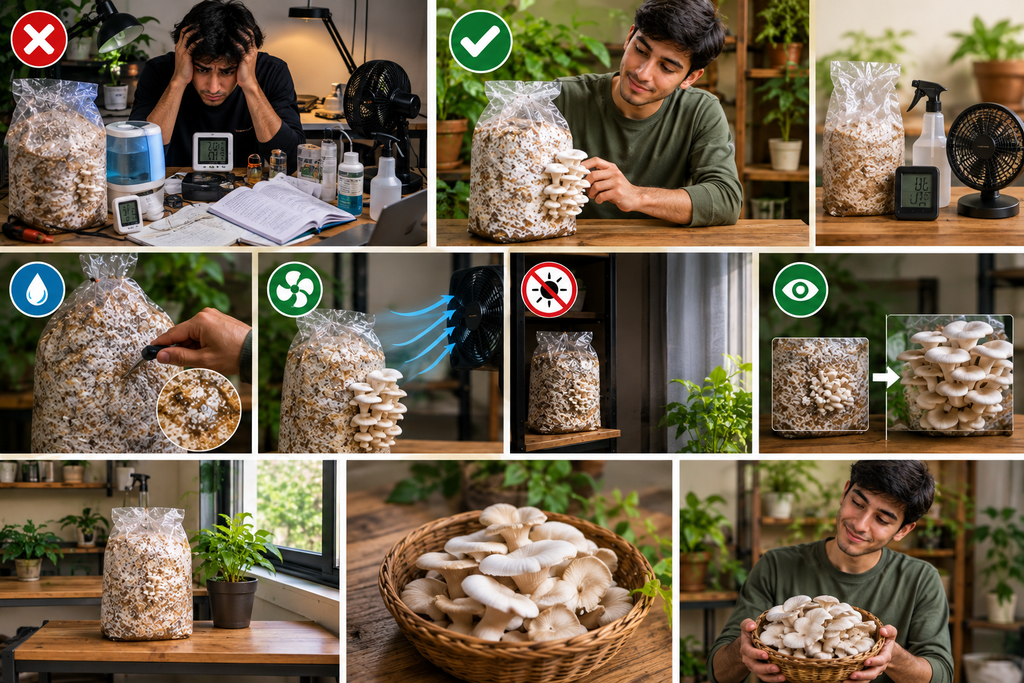
One thing I’d push back on is the idea that growing mushrooms at home has to be complicated. There’s plenty of information focused on controlling every possible detail, specialised equipment, and precise environments. For a beginner using a simple grow bag, that level of detail isn’t necessary and can honestly be discouraging before you’ve even started.
In my experience, paying attention to the basics—appropriate humidity, fresh air, avoiding direct sunlight, and watching how the mushrooms respond—was far more useful than trying to manage every tiny variable. Home mushroom growing is more approachable than it first appears once you stop treating it as something that requires constant, precise control.
FAQ
Do I need special equipment to grow mushrooms at home?
Not necessarily. A basic mushroom grow bag is enough to get started and learn the process without investing in specialised equipment right away.
Where should I keep my mushroom grow bag?
Somewhere indoors, away from direct sunlight, with a fairly steady temperature and some natural airflow. Avoid drafts, heating vents, and spots that get hot during the day.
How often should I mist the grow bag?
Rather than following a fixed schedule, mist when the surface actually looks like it needs moisture. Checking the condition of the bag is more reliable than misting on autopilot.
How do I know when mushrooms are ready to harvest?
Look for caps that have opened out but are still firm and healthy-looking, rather than waiting for them to go completely flat.
Will I get more than one harvest from the same bag?
It’s possible. After the first flush, continue the same care routine (moisture and airflow) rather than assuming the bag is done. A second flush may be smaller and less uniform, but it can still be worthwhile.
Is growing mushrooms harder than growing vegetables?
It’s different rather than necessarily harder. Mushrooms respond to conditions more quickly, and the growth pattern feels less gradual, but the day-to-day care doesn’t have to be complicated.
Final Thoughts
Growing mushrooms at home became much easier for me once I stopped trying to control everything perfectly and started paying attention instead. Moisture, airflow, temperature, and the way the mushrooms themselves were developing told me more than any fixed routine could.
You don’t need to be an expert before you start, and a few mistakes along the way, like I made with over-misting, aren’t a sign of failure. They’re just part of learning how to read what the mushrooms need. A simple grow bag can teach you a surprising amount, and once you get the first harvest, that firm, fresh flavour makes the whole process worth it.


-

 Vegetable Gardening4 months ago
15 Best Veggies to Grow in Your Rooftop Garden for a Huge Harvest
-
 Vegetable Gardening4 months ago
How to Grow Tomato Plants Successfully (Beginner’s Step-by-Step Guide)?
-
 Beginner Guides4 months ago
Grow Onions at Home: The Complete Beginner’s Guide to Bigger Harvests
-
 Vegetable Gardening4 months ago
Why Your Chilli Pepper Plant Isn’t Producing Peppers (And How to Fix It)
-
 Uncategorized3 months ago
How to Grow Zucchini at Home: The Complete Beginner’s Guide for Big Harvests
-

 Vegetable Gardening3 months ago
How to Plant Lettuce: A Simple Step-by-Step Guide for Beginners
-
 Vegetable Gardening4 months ago
How to Grow Pumpkins: The Complete Beginner’s Guide to a Huge Harvest
-
 Gardening Guides3 months ago
When to Plant Vegetables: How to Read Your Garden Instead of a Calendar